Pinterest

Tuesday, November 20, 2012

Garden Review and Vegetable Thanksgiving...


November means more to us than just pumpkin pie, it means it's time to get the garden ready for winter and let it rest,  We haven't mastered gardening year round quite yet but hope next year to put in a small raised bed and plant kale there to get us through to at least December. I finally realized that I'm really not a lettuce fan (gasp!) and that I like greens so much more.  I think it's because greens are more nutrient dense and if I am going to eat greens, then I'm going for the greenest of greens.  So, in the meantime, we mulch our garden heavily with chopped leaves/grass and bales of straw.  Actually I'll let the straw decompose a bit and use it to mulch the paths next year.  


As you can tell, I use lots of pots to supplement our small garden space.  I also use them to plant a nice sized display of flowers for our front patio space...you can see what they look like here.  I have used all of our flower beds for herbs and perennials, so pots are the perfect remedy for always blooming annuals...zinnias, geraniums, alyssum, vinca, marigolds and even a fun elephant ear.


I've also used the pots for herbs such as thyme, peppermints, spearmint, cilantro, rosemary, parsley, chives and calendula.  Peppers, including Mariachi's and Banana, also grow in these pots.  I've been growing tomatoes in them, but will keep them in the garden next year as they didn't produce very well.  The biggest drawback to pots are the fact that they need lots of watering if they are in full sun.  My herbs don't and I keep them in part shade and they are happy campers. A great reason to grow in pots is that you CAN move the pots around if the temps start to rise and the plants need a break.  I move smaller pots around quite a bit.
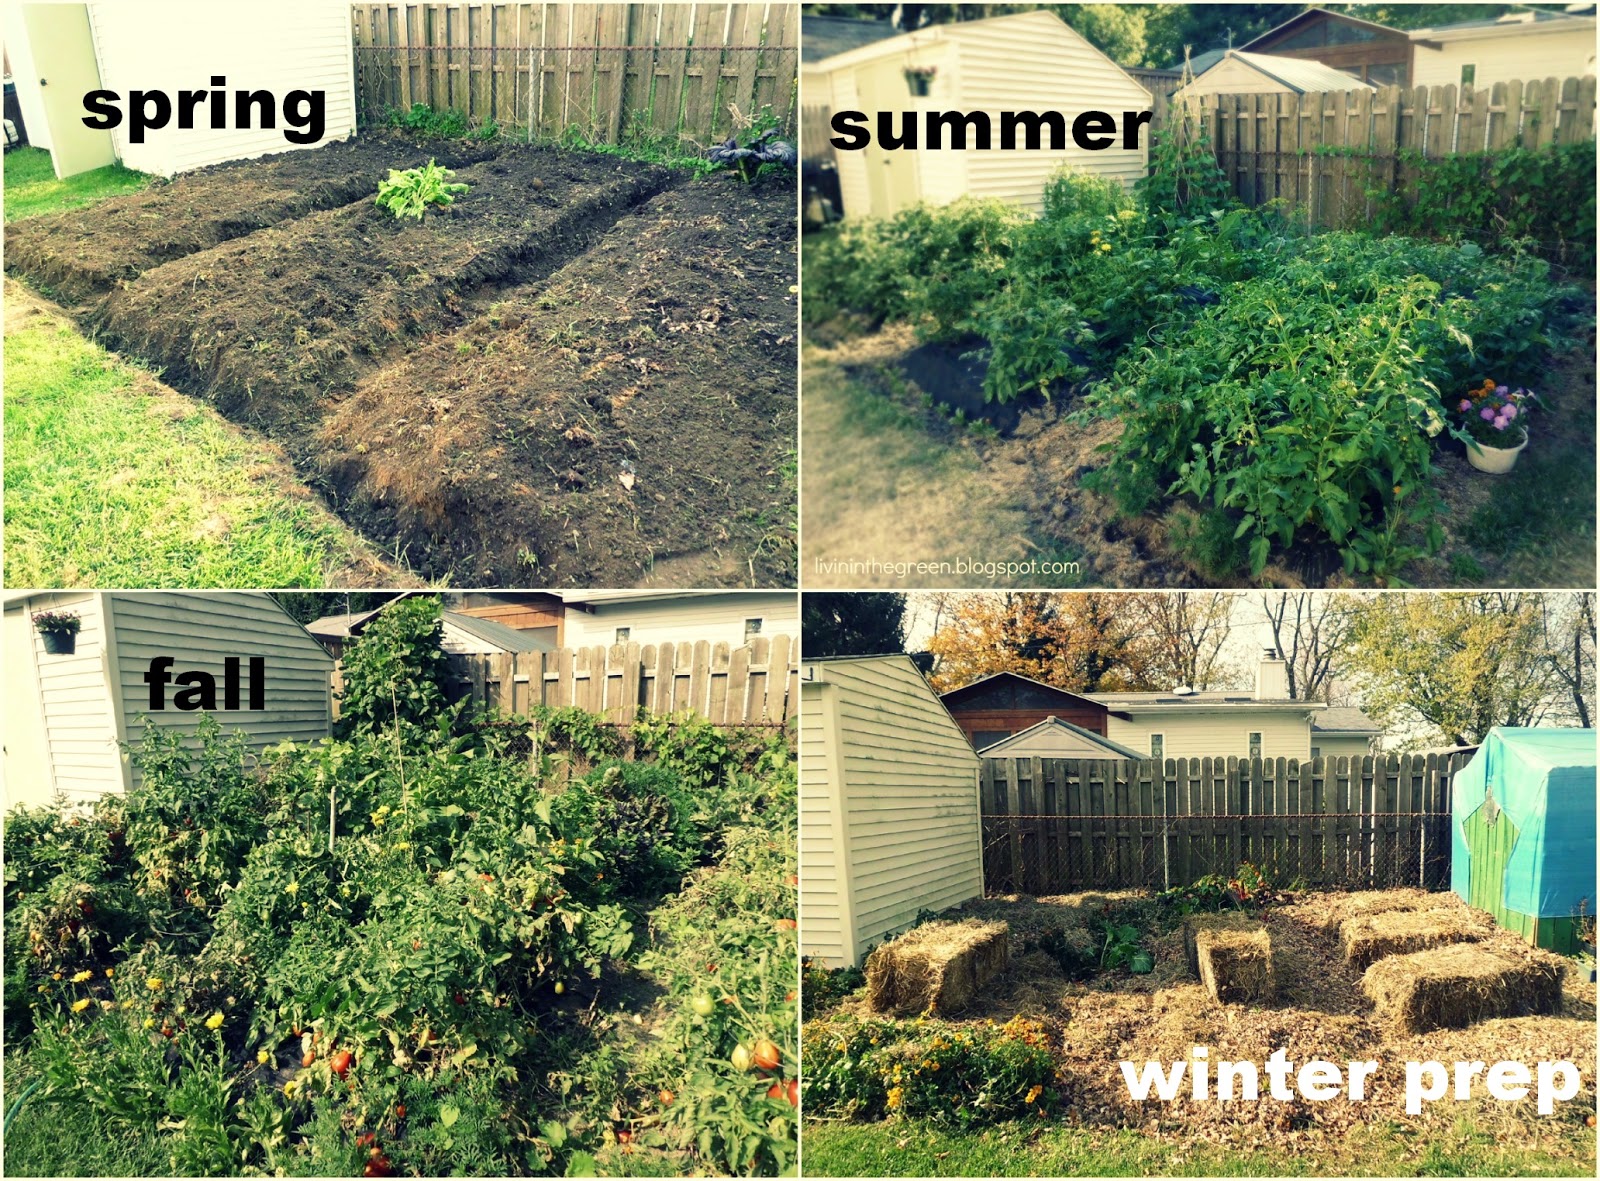

One great thing about blogging about my garden is that it forced me to keep a visual record of the garden for the growing season.  So it was fun putting together this collage of the seasons and to see it all at once.  To be a continuous gardener, you must be visionary and willing to make mistakes.  There's always next year to try out a new method or new vegetable.  The visionary part comes in when you get the soil ready like the soil in the spring photo and can already envision the fall photo in your mind.
 If this garden space looks small, that's because it really is.  But don't let small spaces fool you...with effective gardening, you can get lots of fresh vegetables to eat AND plenty to can, dry and freeze for winter use.


Case in point...these are just a sampling of the produce we got from the garden.  I was able to can 60 jars of whole tomatoes...plus still lots more for fresh eating and fresh marinara sauce.  Our beans and summer/winter squash came from our community garden plot; another option for those with small spaces.  This is our fourth year there and we've finally figured out what vegetables grow well there...tomatoes not being one.  However, the squash did well and the beans, so we'll concentrate on those vegetables.  We're going to try sweet potatoes there next year too as the soil is great for root crops. To see my favorite picks for this year's vegetables, click here.

Well, that's it for the garden 2012...I'll be reading up on some other blogger's great ideas for gardening over the winter while our soil rests and we rest!  SO thankful for all the great food we've gotten from a little space...it's the gift that keeps on giving!

Do you garden or plan to soon?  

Linked to these amazing blog hops...Homestead Revival 
Clever Chicks  Lisa Leonards Design
Farmgirl Friday Living Green Tuesdays
Frugal Days, Sustainable Ways 
Waste-Not, Want-Not Wednesdays Wicked Good Wednesdays
Simple Lives Thursday Farmgiril Friday Blog Hop

Thursday, November 15, 2012

Reviewing My Favorite Tea Steepers for Loose Teas


My last post on Three Reasons to Buy Bulk Tea shared my warm and happy thoughts on loose leaf teas...but when purchasing teas whole leaf, it's easy to get a little overwhelmed at the idea of how to prepare them.  So I hope this post will help take some of the anxiety out of fixing them AND hopefully share some tea steepers that really do a pretty great job of brewing a great cup of tea.  My first foray into whole leaf teas took place many years ago as a newlywed eating at a local Chinese restaurant.  The first sip I had of the prepared tea the waiter brought to the table rocked my liquid world...it was amazing.


Of course, I had to buy the tea for myself...it was too delicious to be true.  So, I asked the Chinese waiter what the name of the tea was and he answered me, but for the life of me I had no idea what he was saying.  Poor guy, I think I asked him to say it about three times before I let him get back to work.  I kept repeating the word that I thought he was saying, but I really had no idea.  
Now this Chinese restaurant had a little store attached and I promptly went over to it and looked for the tea.  I found a golden tin on the shelf labeled "Jasmine" and all of a sudden the waiter's voice echoed in my ear...I realized the tea was jasmine!! Yeah!  So, I bought my tin of amazing tea and took it home...well, it sat unused for a long time.  I couldn't figure out how to fix it and what to use and so on.  I am happy to say that my confusion didn't last too long and I soon accumulated a large collection of tea steepers.  Some gifts, some I bought, some I picked up...you name it.  I went through them all and learned what worked for me and what didn't work.
And here's where my review begins:


First we have the tea steepers that come with punched out holes in them.  I have them in all sizes and shapes (except I curiously don't have the all too familiar egg-shaped tea ball!?)  These have been the most common ones I 've seen around at the grocery store or local Walmart.  I even found a few vintage ones (like the one in the front.)  Now, I have a problem with these steepers.  The first thing is that some of the steepers are ridiculously small.  This picture doesn't show them true to size, but trust me, many are very small.  A small tea steeper means it's difficult to get a decent cup of tea from them.  They're hard to fill and the leaves certainly don't circulate. 

This steeper is so small, but it's really cute and I'll admit - fun to look at!

My second reason for not liking them is that they let some of the tea leaves escape and that  means a cloudy cup of tea.  Not a drink spoiler but let's face it...it bugs me.  I want my cup of tea "clean" as possible as that enables me to re-steep the leaves again.  So, I pretty much do not use any of these unless I have a large leaf tea that won't come out through the holes.  I still own these because my family, much less particular than I, will use them.

Not all mesh is made alike; look for a nice tight weave which limits the amount of escaping leaves.

Next we have the mesh tea steepers.  Now I am interested.  These make much more sense.  However, most of the ones I have are made to filter the tea leaves and not to steep them.  
Like the next two in the photos...


The one above swings so when you're done using it, it drips into its own little tray.  Clever.  


This is a classic English style... at least I've seen them used in BBC tv productions.  But the vintage ones had holes in theirs and not mesh.  These last two "steepers' are best used with a tea pot as you have to pour the tea from one container to the next.  I actually like these two a lot and have used them, but they're not ideal for a single cup of tea.


Now we come to modern days with this really cool tea stick.  I saw this in a coffee/tea magazine when we were managing a coffee house some years ago.  I wanted one really bad at the time.  My husband heard and promptly bought one for me for my birthday.  I won't say how much he paid for it but trust me it was A LOT.  My heart was touched and it really is the coolest steeper on the block.  It does a better job than the steepers with holes, but is not as good as the mesh.  I tend to use it for large leafed greens and it works fine.  You can see how you slide the punched holed cover to measure your tea, close it, steep and stir your tea with just this stick.  Pretty ingenious...just don't overfill.


Now we come this final steeper...the big "daddy" of them all.  I actually bought this one as a part of a set.  It came in a teapot which arrived broken.  I sent the teapot back but kept the steeper because it fit everything from a regular mug to a 32 oz. teapot! This steeper won my heart.  It's made of steel and no plastic parts (I don't care for plastic in steepers) and is perforated with micro holes so that not even the finest rooibos leaves escape.  Not too mention that it is large enough to allow the tea leaves to happily swim about imparting their delicious flavor to the water.  Three great reasons that make this the steeper I go to every time, whether for my teapot or mug.  It was also a reasonable price and you can find this one here (replacement infuser).


Okay, here are my top three steepers.  Actually the little teapot steeper is not very effective, but every tea collection should have one kitsch-y one... :)


There are also many types of disposable tea bags out there in case you don't want anything bulky to store.  You can find a bunch here.  I've bought and made my own tea bags before but have never used these particular ones.  They make sense that they would work, but I would rather stick with a more economical steeper as we drink many cups.  But these seem pretty practical too. 

I also found this one called the Tuffy Tea Steeper.

 It's collapsible so it's easy to store and made from food grade silicone.  Because this one has holes, I think this could work for larger leaf teas; maybe not rooibos so much.  It looks interesting though and tempting, but I am sticking with my large tea infuser for sure.

Okay, that's what I've found so far in my tea drinking journey...what's your favorite way to steep loose leaf tea?

Blessings!

 Linked to these blog parties... Lisa Leonard's Hello Mondays  
Clever Chicks Blog Hop Backyard Farming Connection
Homestead Barn Hop  Waste-Not, Want-Not Wednesdays
Frugal Days, Sustainable Ways 
Gastronomical Soveriegnty/Wednesday Fresh Foods Natural Living Link-Up
Simple Lives Thursday   Farmgirl Friday Blog Hop

Friday, November 9, 2012

Fall-ing for A Covered Bridge...


  Out for lunch on a chilly fall day, my mom and I decided to drive the long way back home and drove by this local park and covered bridge. 
I think fall is the perfect time to visit historic places, something about the color of the leaves and general feel of the season that draws you a bit closer to history.  Even though the day was cloudy and drizzly, I managed to snap a few photos of our fall at its peak.  


Here are some wild aster flowers alongside the bridge... I love the beautiful blue color of its petals.  It's not a color you see often in plants, especially in the "wild."


Here's the bridge entrance on foot.  Wood never looked so good against all the golds and reds of the trees.


The bridge was built in 1868 with some repairs through the years...


You know I had to sneak in another flower picture somewhere.... :)


 This cantilevered walkway was added in 1992 during a large renovation on the bridge itself.  It beckons its visitors to come and take a walk...and I couldn't refuse the invite!


There's a park and picnic area along the shore to the left in this photo.  The bridge always attracts plenty of fisherman in the summer as well.


It's pretty amazing to be driving across a wooden structure...you really need to roll down the windows a bit to capture the sound of the boards creaking as you go across.


Coming out the other side; a burst of sunlight and beautiful fall foliage.


The whole drive around the bridge was full of lots of beautiful trees...ahhh; this is why we love autumn!

Where's your favorite place to visit in the fall? 

Blessings! 

Sharing with these blog hops: Your Sunday Best 
Weekly Top Shot  Homestead Revival: Barn Hop   
Lisa Leonard's Hello Monday
Backyard Farming Connection  Take it From Me Wednesdays  
Frugal Days, Sustainable Ways
Wicked Good Wednesdays   Simple Lives Thursday  
Insta Friday

Tuesday, November 6, 2012

Three Reasons Why to Buy Bulk Loose Tea.


When it comes to buying in bulk, it seems natural enough for coffee...but what about tea?  For some reason, it seems like a crazy purchase that makes no sense but I want to show you three great reasons you should consider buying your tea this way.  If you only ever drink a cup of tea every once in a while, then this is probably not for you.  However, if you enjoy drinking it hot or iced all year long like we do, then you'll want to read on to see why it's a great idea to buy lots of tea leaves and step away from the tea bag!

We drink all kinds of teas because they taste great, but also because they're nutritious and medicinal.  Green, white, oolong and black teas all come from Camellia Sinensis plant or bush.  They are all the same leaf but look and taste different based on the way they were dried and processed. White/green being the only non-processed leaf. They all contain antioxidants but green and white contain the most.  Green tea has been researched quite a bit in recent years and is found to be helpful in preventing cancer, stomach conditions, beneficial for the liver and skin (resource.)

Herbals, especially "rooibos" are also chock full of antioxidants as well as alpha-hydroxy and I drink this one for my skin on a daily basis. Rooibos comes from a plant in Africa, so even though it has the dark coloring of black tea, it actually is decaffinated and has no tannins.  No tannins = not bitter!  I have a "caffeine-sensitivity" so Rooibos gives me the benefits of green tea without the caffeine.

Of course, all this information makes them a great reason to drink more tea.  So, we drink these in place of sodas and sugared vitamin waters as they do so much more than just taste great. 

Now I still do have and use teabags, but our main teas I buy in bulk.  There's room for both in your tea locker (yes, I do have an actual painted locker I use for herbs and teas!) but buying your tea loose leaf and in larger quantities makes LOTS of sense.

  Okay, let's get  on to the reasons...

Reason #1: Taste!  Buying your tea loose leaf is going to naturally result in MUCH better tasting teas.  One reason is that the leaves are much larger and not broken down in order to fit into the bags.  Once a leaf has been broken in pieces, it begins to lose its essential oils which means it loses much of its flavor.  The first time I tasted bulk loose tea leaves that I had steeped myself, it was a tea experience epiphany! It's like comparing a value hamburger to a prime rib...no comparison.  Now, you can get a decent cup of tea from a bag sometimes, but it's never the same as with good quality loose leaf tea.  Cup after cup, I can tell the difference and tea has never been the same since I tasted it this way.  Quality wins, every time.


Reason #2: Value.  Yes, when you see how much a pound of tea costs, it's can be a bit of a shock.  It's almost always much more than a pound of coffee, however, I've found several places that sell great tea at a great price. (Check out Adagio Tea for Rooibos, Mountain Rose Herbs for Green)  I pay only 10 cents a cup for a pound of organic rooibos from Adagio Teas.  Plus, every purchase, review and post on Facebook gives me points towards 100 points for $10  coupon for my next order!  It's a great deal and I've been ordering from them for years. Plus they have the best shipping prices that I've found on the web.  A good gunpowder green tea can be purchased from Mountain Rose Herbs. Only $12 a pound!  Also, if you buy great quality tea, this means you'll end up with leaves that you can steep multiple times.  And that means more $$ for your buck. We usually steep twice and then drink the tea iced the next day. Yes, I know tea bags can be steeped again but we're talking about gourmet high quality tea that taste great.  It's a much better tasting tea,
  Can't drink a pound?  Consider putting in a fun packages and gifting some of it.  Or, find another tea addict, I mean, tea drinker and goes halvies with them.  I have quite a lot of tea here...there are four of us and we drink an assortment of herbals, greens and black tea and it doesn't go to waste!


Reason #3: It's Green!  That's right.  No more tea bags, strings and boxes to go into landfill.  I recycle my boxes and compost the paper tea bags, but they do take awhile to break down.  This also brings me to the new line of teas in the pyramid bags.  They put them in these bags so they don't have to break up the tea leaves and lose its flavor.  Great idea, however, these bags seem to be made of some kind of nylon material.  Definitely NOT going into my compost bin :(.  Now when I'm brewing loose leaf tea and I'm finished with my multiple steepings, I simply compost the tea leaves. Done.  I like this reason...while I do use some tea bags especially when I'm on the go, most of my steeping is done paper free.  


  Of course this all touches on what you steep your tea with and that will be for another post.  I have an assortment of tea steepers and I'll show you my favorites and why I like them.  There are some great products to steep with now and it's so easy to use them, you'll wonder why you didn't drink loose tea sooner!


Storage is premium for bulk loose tea.  But it's also simple.  They usually come in a foil bag with a zip closer.  I mostly keep them in these bags, in my tea locker (any pantry or cabinet away from light and moisture will do) or in any kind of air tight container. 


I have quite a few tea tins that I use and re-label to store new teas in as well.  I have one tin of Jasmine that I've stored for a good ten (yikes!) years and it still smells amazing whenever I open it.  Now, the teas should be used faster than that, but it does show you how proper storage can extend their lives!

I hope this inspires you to try bulk loose teas or to as least consider them.  If you've never tried quality tea, then well, this could be the time to drink it...it will revolutionize your taste buds!!

Blessings!!

What's your favorite tea? 

Are you a fan of tea?  You may want to check out these posts...Vintage Tea Room Fun
Tea Chat at the Open Door Coffee House  Mother's Day Tea Party


Linked to these blog parties...Living Green Tuesday Link-Ups 
Frugal Days, Sustainable Ways  Wednesday Fresh Food Link-Up 
Waste Not-Want Not-Wednesdays
Wicked Good Wednesday  
Natural Living Link-Up
Small Footprint Friday 
Homestead Revival Barn Hop  Backyard Farming Connection

Friday, November 2, 2012

A Fall Lunch in Amish Country


What is a perfect way to spend a mid fall day?  How about in Amish country?  And eating "home-style" cooking??  Perfect.  That was our destination on a recent Saturday (pre-Hurricane Sandy) and it really made autumn complete for us.  Our "boys" grew up visiting here in the summer and fall and for them it was THE definition of a great family day together.  We've been rather short on those lately between school and jobs...so this was a great family get-a-way!
And where better for us to visit than Middlefield?  A nice sized Amish community about 40 miles south of us.  Rural, country and boasting "Mary Yoder's Amish Kitchen," it never disappoints.

A row of willow rockers are there to greet you...
We've been coming to this restaurant for over 20 years now and it's not only still the same great food, but they've expanded the gift shop so it's a one-stop shop for all your country needs.  They really feature local artisans, Amish and otherwise, so you'll find a little bit of everything...

These rockers are THE most comfortable chairs ever...(at least our guys think so!)

This sign says it all.  You know you've entered into a country dimension with the myriad amount of crafts, food and homespun.  It's an ecclectic mix where you're sure to find something to please.


Little circles of fabric look like flowers scattered in a field...


That turn into this fabulous Yo-You quilt...locally made of course!


And let's not forget the eats...that's the main attraction here.  It was Saturday so it was a hot buffet (including salad bar), all-you-can-eat, baked chicken, pot roast, green beans, carrots, real mashed potatoes, unbelievably delicious!  It feels like you're going to Grandma's house.  I think my mouth is watering...again! (Oh, and we finished this meal with their homemade Peanut Butter Pie...wow!)

Alas, my lack of photo skills for food pictures didn't quite capture how amazing this pot roast with noodles really was!!
If for some reason you're still hungry, then the gift shop offers lots of take home, home made foods.

  
 Couldn't resist these sweet harvest table decorations.  They would make a perfect Thanksgiving table...


It really was a great meal and a lots of fun together...on the way out, I couldn't help but take a picture of this pot of mums with only one flower escaping a fall frost.


Our day didn't end here fortunately.  We took our time visiting an Amish vegetable stand, stopping at a local cheese factory to pick up a pound of their own Colby-Jack Habanaro Cheese and finishing up in another little town at their general store.  Another really cute place to see and holding lots of memories for us all.


It really felt like autumn for us and good thing too because the hurricane really has left us feeling very winter-like, with most of the trees stripped of their leaves.  

Well, thanks for reading and sharing a part of our day. Sorry I have no peanut butter pie to offer you all, but if you ever have the chance to have a piece...you won't regret it!  Blessings!

What's your favorite fall memory? 

Like more autumn photos?  Check out Fall's Floral Postcards .

Linked to these blog hops...Your Sunday Best     Simple and Joyful: Fall Festivals   
Homestead Revival: Barn Hop   
Hello Mondays!
Clever Chicks Blog Hop  Backyard Farming Connection 
Frugally Sustainable: Frugal Days, Sustainable Ways  
Rural Thursday Blog Hop 
Friday, October 26, 2012

Garlic Ear Oil Remedy: Does It Really Work?


You may have seen this recipe before and wondered, hmmmm...does this really work?  Especially if you have a toddler who is tugging at their ear, in pain...not happy to say the least.  That's where I was over 10 years ago.  Our two guys seemed to both fight frequent ear infections and I was getting caught up in the habit of running them to the doctors for antibiotics a lot.  Plus, I was hearing "horror" stories of "tubes in their ears" and  on going, recurrent infections from moms all around me.  It made me a bit desperate and willing to try something natural.  Not that I wasn't in to natural, I was really discovering herbs and gardening, but I was still new to the whole medical use of them all.  I also didn't have the internet to do any research and most of my friends thought the herbal stuff was wacky.  That's when I ran across a small article in a homesteading supply magazine.  It was about a garlic oil treatment and how this man had used it on his kids for their ear infections and it really worked!  He was so sincere and humble in his article that I thought, "why not give it a try?"


Little did I understand the power behind this lowly piece of garlic.  How could something that makes awesome garlic bread kill an infection?  I was soon to find out.  The next time one of our kiddos started complaining about their ear, I found the recipe and went for it.


What I love most about this recipe is how simple it is.  No mail order catalogs, no 4-6 weeks of waiting on a tincture...this stuff is ready to go in about 15 minutes after prepping.  Inexpensive and highly effective, it's a hard one to beat.  All you need is a garlic clove or two (depending on the size) and some olive oil.  Mince the garlic clove and place it in a clean container.
 

Like you see here.  Then cover it with a little olive oil.  
 

 I actually used too much oil in the photos because I was snapping the shot while pouring.  If this were to happen to you, you can add more garlic.  The more the merrier as it will be more powerful in the oil.

Then let it sit in the oil for about 15 minutes.  The allicin in the garlic is released (thus the strong odor) and this unlocks more of the garlic's potent powers of healing.  


Then gather what you're going to need.  A rice bag or if you don't have one, try using a clean  cotton sock and fill with a cup or two of rice, tie off at the top. To heat, dampen slightly and place on a clean plate in microwave for about 30 seconds.  You can always add more time if the bag isn't warm enough.  Remember to move the rice bag around after heating to disperse the heated rice.


When everything is ready, have your child or ear ache sufferer lie on their side with infected ear up.  Place a 30 minute dvd on for them.  Strain the garlic bits from the oil  and put some in a teaspoon. (I would fill a small mug with hot tap water and place a spoon of the garlic oil gently on top of the water to warm it.  Make sure the spoon doesn't get water in it.)  
 
After the oil is warmed, use a dropper or the smallest spoon you can find and place 5-10 drops (1/4 tsp) into the infected ear.  Put a cotton ball or a small wad of tissue in ear.  Then here's the part the man who wrote the recipe said, "use a damp wash cloth and place next on the ear.  Then add some warm heat and cover with a towel." (Work with your child on how much heat they can handle and use a hand towel around the bag if it's too hot.) He stressed how this remedy only worked well with damp heat.  I don't know the science behind this, I just did what the man said and....IT WORKED!! I mean, every time!  I would do this treatment on them (usually both ears) at least twice a day for about two days.  After that, they were back to their usual self.  I did give them pain relievers to help them sleep, but that's it.

It worked for us and I used it for a number of years until they outgrew ear infections.  

That's it, that simple and that effective! I would love to thank the man who was willing to share his own experience with this remedy, but I have no idea who he is. So I thank him by passing on my experience with it to you so you can decide for yourself.

Of course, if there is a high fever, or threat of ear eruption, please take your child to the doctor, and I'm not trying to diagnose as a medical practitioner...just passing on a sensible herbal remedy for you to try.

Oh, the leftover garlic oil? I would cover and refrigerate for a few days and discard after that.  It's so easy to make fresh that I didn't need to store it.  Super nice. 
One more thing...I would give the little guys echinacea tea in a bottle or cup while they were fighting off the infection too.  They still love to drink it now and they are 16 and 19! 

(Consider pinning this remedy for when you need it!!)

Hope this helps...blessings!
Linked to these amazing blog parties...Homestead Revival Barn Hop