Pinterest

Showing posts with label herbal. Show all posts

Tuesday, March 26, 2013

Rooibos Tea: An Herbal Wonder


Years ago while I was learning about teas and herbals, I decided to look for a tea I could drink on a daily basis.  I am sensitive to caffeine so regular tea wasn't going to work even though I love it.  I tried lots and lots of herbals as well and couldn't find one that gave me the feeling of black/green teas.  I needed to find something that would take the place of regular tea without any caffeine at all in it and that's where rooibos (roy-boss) came in.  

A South African native plant, rooibos has been consumed there for generations by the native people and is served everywhere as the tea of choice. First noticed by Europeans in the late 1700's, it slowly came to other countries as it was considered a black tea alternative as far as taste.  I find rooibos to have a slightly sweet,sometimes fruity, earthy, full bodied flavor.  It's red in color and gives me the sense of drinking a cup of black tea without any of tea's bitter notes.

Rooibos Bush (Photo Source)
 

Red rooibos is made by bruising the needle-like leaves and then allowing them to ferment.  Green rooibos is not oxidized and costs a bit more because it's more labor intensive to produce.  Green tea has more of an herbal, grass-like taste.  Both teas are often paired with other flavors to bring out the best of its flavors.  I enjoy red rooibos with vanilla and apple cinnamon, which really brings out the herbs natural fruity flavors.

This is one herb that can be steeped for long periods of time without any bitterness due to rooibos' lack of tannins.  I often leave my tea basket of leaves steep for an hour with no adverse effects of flavor.  I like to extract all of its medicinal benefits but steeping five minutes in boiling water is the normal way to prepare this tea.  Unlike many herbals, red rooibos can be served with cream and sweetened as desired. 


                                           So what are the health benefits of rooibos?

First of all, I like to look at rooibos as a nice tonic type of herb.  In other words, it's okay to use long term and safe for kids. This is important as I was looking for something mild enough to drink on a daily basis.  So, most of its benefits are long term and for helpful for your overall health.

In South Africa it's traditional uses are for colic, allergies, asthma and dermatological conditions.

                                                       Rooibos Tea and Antioxidants

It also contains anti-oxidants. Some articles claim that it contains more than green tea, and others the same. So based off of that information, I would say it's safe to say it's a good alternative to green tea.  Its two comparatively rare antioxidants, aspalathin and nothofagin, each have different benefits. Aspalathin helps to modify hormones in the body, which in turn help to reduce stress and metabolic disorders. Nothofagin demonstrates significant anti-inflammatory activity.  Both antioxidants may help to reduce the risk of Alzheimer's and are both good for the nerves.


 Helpful against Diabetes?

Both of these antioxidants also help to regulate blood sugar which in turn can help to reduce the risk of Type 2 diabetes and excessive fat production.  This would be an excellent beverage to drink along with a low carb/fat diet to help bring maximum benefits to your body against any sugar problems.

                                                  Helpful against Cardiovascular Problems?

 Rooibos also contains the super-antioxidant compound quercetin, noted for promoting heart health.  Quercetin acts as an anti-inflammatory which helps against heart disease and cancer.
In one study where 6 cups were consumed daily, some of the results were that it lowered levels of LDL (lousy cholesterol) and raised HDL (healthy cholesterol) making it very valuable for overall heart health.


Rooibos is really a great herbal beverage to add to your tea locker.  I have found that red rooibos is generally less expensive (in loose, bulk quantity) and is a great drink to enjoy hot or iced.  You'll often find it in herbal blends with chai or vanilla, both great flavors to drink with rooibos.  Drinking it in a blend is also a great way to get introduced to its unique flavor.  I like to buy plain rooibos and add it to our Summer Tea Blend to boost its already great health qualities.  You can mix plain rooibos with fruity herbal teas to find what flavors you like best.

I drink about 24 oz of rooibos a day.  Usually red but sometimes green in a blend.  I really enjoy it and not only am I getting hydrated but also am receiving its many amazing health attributes. I love the idea of drinking something that I not only enjoy, but it's great for me too.

Hope you were able to learn something new about this fabulous African herbal!  Blessings!

Do you enjoy rooibos?  What's your favorite flavor?


Resources:

http://www.foxnews.com/health/2012/03/27/red-tea-even-better-for-than-green-tea/ 
http://www.healthyfellow.com/230/rooibos-and-diabetes/
http://en.wikipedia.org/wiki/Rooibos
http://undergroundhealthreporter.com/red-rooibos-tea-health-benefits#axzz2OgZDp8eJ

Linked to these amazing blog parties: Waste Not, Want Not Wednesday
Seasonal Celebration Wednesday  Wildcrafting Wednesday
Simple Lives Thursday Homestead Barn Hop
Frugal Days, Sustainable Ways 

Tuesday, February 19, 2013

Valerian: Natural Sleep Aid and Relaxant


Soon after I married, I began to take a huge interest in herbs and herbal medicines.  I don't know where this interest came from, but it was consuming.  I think I checked out every book from the library I could get on the subject and got herbal reference books for a few years after that.  

 All this study paid off because after our two boys were born and while still babies and toddlers, I began to look for a natural sleep aid.  I soon started using Valerian Root to help get through some restless nights.  My husband, highly skeptical but very desperate, began to use them as well.  We soon discovered that this highly unlikely herb had a permanent place in our medicine cabinet and we've been using it for over 15 years.


Valerian has been used for centuries to help soothe nervous tensions, anxiety and mild insomnia.


Even though we use it mostly as a sleep aid, Valerian is very effective as an overall tension reliever.  "It contains some unique substances such as valerenic acid and valeranon that have a central and muscle relaxant action that is particularly effective in treating stress and anxiety. It is one of the first herbs to consider if looking for a remedy to ease anxiety and panic attacks." (Source)


Valerian promotes an overall feeling of calmness and soothes and relaxes the muscular system.  


This is what causes you to be able to sleep as well.  It's not that it putting you to sleep, as much as it is relaxing you enough that your body is able to calm down and therefore you can go to sleep.

It relaxes the muscular system so well, that when I have a chiropractor's appointment, I always take 2 capsules (400 mg each) a half an hour to an hour before I go.  I always have a good adjustment when I do this.  If I don't take them, I usually don't adjust nearly as well and have more pain afterwards.

I have also used Valerian to help treat tension headaches that are going into a migraine headache.  I will take a few with a pain reliever and then continue to take them every few hours. They have really helped calm muscle spasms.  This makes them helpful for menstrual cramps as well.
  
 Valerian is great for cases of mild insomnia.  It helps you get a refreshing night's sleep but doesn't leave you with any side effects the next day.  

This is important as the whole point of sleeping is to feel refreshed the next day and Valerian can accomplish this without feeling over medicated.

I have found that if I'm am very stressed or having problems sleeping that Valerian can't handle, I will work on exercising, taking some chamomile tea, and overall relaxing more before bedtime.  It generally lasts me for four hours a night.  If I wake up after that, I will take another capsule which will get me through the rest of the early morning hours.


Valerian needs to be taken over the course of a few weeks in order for it to work for mild insomnia.

Like many herbal remedies, Valerian's benefits are gentle and accumulative.  This means you'll want to give it some time before you may notice a significant change.


More Benefits of Valerian:
  - It's very easy to find and buy.  I love the idea that I can just run to the drugstore and for a little over $3.00 a bottle, can bring a hundred capsules home.  You can also make your own capsules from purchased dried powder or your own plants.  Of course, if you make your own then you'll have to sacrifice your plant, but it does self sow pretty easily.

    - It's gentle and effective and non-habit forming.  You won't want to take it every day of your life for sure, but it is thought to be generally safe and even can have some health benefits.  We usually take a break from it after using it for a month or so but have never had any side effects from taking it long term.  This is one herb that is gentle enough to be considered a tonic.

Any Con's for Taking Valerian?
   - It is very odorous and this makes it not good for a tea but a capsule or maybe a tincture.  The Greeks named it "phu" because it smells, well, really bad.  Yes, this makes it hard to get past the lips, but once done, its benefits far outweigh any off odors.  I remember smelling a terrible odor in our bedroom one time.  We couldn't figure out where it was coming from and I actually thought something had died in that part of the room.  I finally discovered the source...an opened bottle of Valerian.  I didn't make that mistake again!  

Valerian is too valuable of an herb to let a little bit of an odor get in the way. :)    


You can certainly grow your own Valerian, just make sure it's Valerian Officinalis to get the medicinal qualities you are looking for.  The upper parts of the plants are healing as well.  The plant is also used externally to help with bruising and minor infections.

I have not grown any as the capsules are so easy to find.  But it wouldn't be a bad idea to have a plant in the herb bed. Just another note...cats love this plant, so if you live in an area with roaming cats, be aware as they'll pretty much ruin it.  I lost a beloved catmint plant this way.  You'll want to put it in a place where it can have some protection from the feline species.

So, the next time you're struggling with sleep make sure to check out Valerian...just make sure to plug your nose when you open your first bottle! 

Blessings!

Have you used Valerian before?  How do you like it and what do you use it for?


Resources:

http://www.herbalsafety.utep.edu/facts.asp?ID=38 
http://www.herbfacts.co.uk/pages/herb-file/valerian.php 
http://botanical.com/botanical/mgmh/v/valeri01.html

Linked to these amazing blog parties...Waste Not, Want Not Wednesdays
Seasonal Celebration Wildcrafting Wednesday
The Homeacre Hop Simple Lives Thursday
Natural Living Link-Up The Country Homemaker Hop
Homestead Barn Hop The Backyard Farming Connection Hop
Living Green Tuesdays Link-Up Natural Living Mondays
Frugal Days, Sustainable Ways 

Friday, October 26, 2012

Garlic Ear Oil Remedy: Does It Really Work?


You may have seen this recipe before and wondered, hmmmm...does this really work?  Especially if you have a toddler who is tugging at their ear, in pain...not happy to say the least.  That's where I was over 10 years ago.  Our two guys seemed to both fight frequent ear infections and I was getting caught up in the habit of running them to the doctors for antibiotics a lot.  Plus, I was hearing "horror" stories of "tubes in their ears" and  on going, recurrent infections from moms all around me.  It made me a bit desperate and willing to try something natural.  Not that I wasn't in to natural, I was really discovering herbs and gardening, but I was still new to the whole medical use of them all.  I also didn't have the internet to do any research and most of my friends thought the herbal stuff was wacky.  That's when I ran across a small article in a homesteading supply magazine.  It was about a garlic oil treatment and how this man had used it on his kids for their ear infections and it really worked!  He was so sincere and humble in his article that I thought, "why not give it a try?"


Little did I understand the power behind this lowly piece of garlic.  How could something that makes awesome garlic bread kill an infection?  I was soon to find out.  The next time one of our kiddos started complaining about their ear, I found the recipe and went for it.


What I love most about this recipe is how simple it is.  No mail order catalogs, no 4-6 weeks of waiting on a tincture...this stuff is ready to go in about 15 minutes after prepping.  Inexpensive and highly effective, it's a hard one to beat.  All you need is a garlic clove or two (depending on the size) and some olive oil.  Mince the garlic clove and place it in a clean container.
 

Like you see here.  Then cover it with a little olive oil.  
 

 I actually used too much oil in the photos because I was snapping the shot while pouring.  If this were to happen to you, you can add more garlic.  The more the merrier as it will be more powerful in the oil.

Then let it sit in the oil for about 15 minutes.  The allicin in the garlic is released (thus the strong odor) and this unlocks more of the garlic's potent powers of healing.  


Then gather what you're going to need.  A rice bag or if you don't have one, try using a clean  cotton sock and fill with a cup or two of rice, tie off at the top. To heat, dampen slightly and place on a clean plate in microwave for about 30 seconds.  You can always add more time if the bag isn't warm enough.  Remember to move the rice bag around after heating to disperse the heated rice.


When everything is ready, have your child or ear ache sufferer lie on their side with infected ear up.  Place a 30 minute dvd on for them.  Strain the garlic bits from the oil  and put some in a teaspoon. (I would fill a small mug with hot tap water and place a spoon of the garlic oil gently on top of the water to warm it.  Make sure the spoon doesn't get water in it.)  
 
After the oil is warmed, use a dropper or the smallest spoon you can find and place 5-10 drops (1/4 tsp) into the infected ear.  Put a cotton ball or a small wad of tissue in ear.  Then here's the part the man who wrote the recipe said, "use a damp wash cloth and place next on the ear.  Then add some warm heat and cover with a towel." (Work with your child on how much heat they can handle and use a hand towel around the bag if it's too hot.) He stressed how this remedy only worked well with damp heat.  I don't know the science behind this, I just did what the man said and....IT WORKED!! I mean, every time!  I would do this treatment on them (usually both ears) at least twice a day for about two days.  After that, they were back to their usual self.  I did give them pain relievers to help them sleep, but that's it.

It worked for us and I used it for a number of years until they outgrew ear infections.  

That's it, that simple and that effective! I would love to thank the man who was willing to share his own experience with this remedy, but I have no idea who he is. So I thank him by passing on my experience with it to you so you can decide for yourself.

Of course, if there is a high fever, or threat of ear eruption, please take your child to the doctor, and I'm not trying to diagnose as a medical practitioner...just passing on a sensible herbal remedy for you to try.

Oh, the leftover garlic oil? I would cover and refrigerate for a few days and discard after that.  It's so easy to make fresh that I didn't need to store it.  Super nice. 
One more thing...I would give the little guys echinacea tea in a bottle or cup while they were fighting off the infection too.  They still love to drink it now and they are 16 and 19! 

(Consider pinning this remedy for when you need it!!)

Hope this helps...blessings!
Linked to these amazing blog parties...Homestead Revival Barn Hop 

Tuesday, October 9, 2012

Making a Double Lemon Balm Tincture


So many of you have probably not only heard of tinctures, but have already made plenty of your own.  I have made them in the past, (I mean MANY moons ago...) and have recently been making them again.  I stopped making them because life got busy.  However, seeing how easy and inexpensive they are to make and use, it seems silly not to make them.  In this post I will show you how to easily double tincture whatever herb or root you are using.  I found this technique last winter when I was researching on You Tube on how to tincture again.  It makes so much sense, I had to try it myself.


I am using Lemon Balm AND I am tincturing it fresh.  I've dried it before and it tastes like pretty much nothing.  This is one of those herbs that don't hold on to their essential oils very well.  Lemon Balm itself is a calming tonic herb.  It was generally used to help promote an overall sense of well-being.  It's also soothing and sedative, which is why I'm making some!  I plan on using it before going to bed and for those stressful days.  I normally use Valerian to help relax, but that stuff makes me VERY sleepy (not good during the day) and I'm figuring that making a tincture formula will help me regulate how much I need as opposed to using an herb in a capsule.


On to tincturing!  Get your Vodka, and make it at least 80 -100 proof for the best extractive qualities.  I have mine ready to pour...


It's a pretty simple process.  Gather your lemon balm, making sure to use the uppermost leaves for the best quality and pack it tightly into a clean, dry, sterile jar.  I am using the ever popular canning jar, pint size to be exact.  Make sure to macerate or crush the leaves as much as possible to get those essential oils flowing...


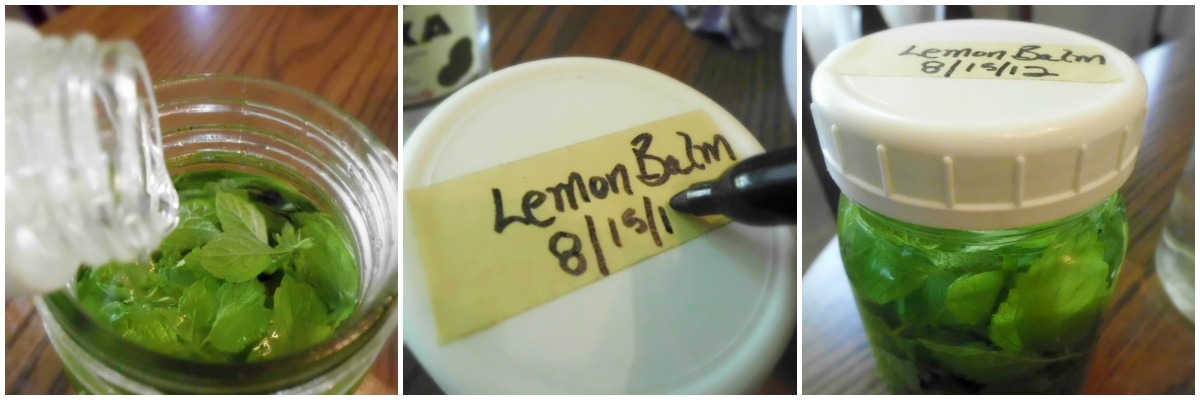
Fill to the top with your vodka, label and cap.  Make sure all the leaves are covered.  I usually add more vodka after a day because the leaves absorb some of the liquid.


On my label, I put the date of when the tincture is done.  It's usually four weeks.  You can put both start and finish date if you want.  I sometimes let it go a little longer.  When it's done, you will need to strain your tincture into a clean jar or container.  Notice the leaf color change?


Here's a single tincture of lemon balm. I love the nice amber color.  This is fine to bottle and use right now, BUT we are going to do this again...!


Now, simply follow the first steps again, and add the first tincture to the fresh lemon balm leaves. 


Here we go with Round #2...top off with more fresh vodka if your tincture doesn't cover the leaves you have in the jar.


Label for four weeks...


Then strain, you know the drill and this is what you get...can you tell which one is the double tincture??!!!


Single tincture on the left...Double tincture on the right.  Amazing!

Well, there you have it.  A double tinctured lemon balm.  You can of course, do a triple tincture but I doubt the color will show up much darker on camera.  I will definitely triple tincture next summer when my lemon balm is in full swing.  To make more of a concentrate for the same amount of tincture is a great idea AND I'm glad I fell across this little jewel of information on You Tube. 

Remember too that you can use this technique for all your tinctures; just always start with fresh material.  It could be pricey if you are buying the plant material, but if you have your own, like echinacea, valerian, chamomile, peppermint, elderberry...you get the idea.  The cost is minimal.  (Don't forget to pin this so you can save the "how-to's" for later!)

What's your favorite tincture to make for your herbal medicine cabinet?  Blessings everyone!

(Want another great use for Lemon Balm?  Check out this post, Tea-licious with Lemon Balm.)


Linked to Farm Girl Blog Fest , Backyard Farming Connection Hop
Welcome Wednesday , Frugal Days, Sustainable Ways  
Rural Thursday
Simple Lives Thursday 
Natural Living Link-Up
Small Footprint Friday 
Homestead Revival Barn Hop 

Tuesday, June 19, 2012

Tea-licious with Lemon Balm


It's official, today is the first day of summer and what better way to celebrate than with a glass of iced herbal tea made with Melissa Officianalis, aka...Lemon Balm.
I've been making this tea for some years now and we all enjoy it during the summer.  This isn't just a delicious tea though, Lemon Balm has long been used as a general health tonic.  The list of ailments it has been used to treat over the centuries is amazing.  Everything from anxiety/depression, ADD, fever, colic, digestive issues, to bee stings; this herb is a must in everyone's herbal garden.
We just love to drink it.  I figure it is good for the body as well as the senses, so here's a look at how I make it into a tea known as my "Summer Tea."

Lemon Balm
I grow this herb on the sunny south side of our house.  It gets pretty hot there and the soil isn't too great.  That's probably a good thing, because this is one herb that loves to spread.  So, if you plant yours, give it full sun and room to grow.  You'll appreciate it's health benefits and well as its summery flavor.


I only use the very tops of each branch.  These have the best flavor.

I make a dry mix base for my Summer Tea.  I use Green Rooibos which is mineral and antioxidant rich.


I also add (from top left, down to right) rose hips for flavor, hibiscus and lemon grass.  These give it a fruity citrus taste and the hibiscus gives it a pretty ruby color.


I use equal parts of all the ingredients except for the green rooibos, I use 2 parts for that.  So, in other words, one cup of rose hips, one cup of hibiscus flowers, one cup of lemon grass and 2 cups of green rooibos.
  

Add a half of a cup to the dish you'll be steeping your lemon balm.


Let steep for at least 20 minutes to get the maximum health benefits from the balm. 


When done steeping, strain your tea into a one gallon sun tea jar container.  If the tea water is still hot, I add cold cold water to my sun tea jar (about half way filled) so the jar won't crack with the hot water.  Top up the sun tea jar with fresh cold water and wha-la!  You have a gallon of Lemon Balm Summer Tea!  Add ice and sweeten (I use Stevia, another great herb with health benefits) and drink away...so delicious and so refreshing AND it's great for you!


It's tee-rific!  Okay, no more tea puns, but seriously, you'll love it!  Blessings!

Check out Frugally Sustainable for more great ideas!  Their link is here.