Pinterest

Showing posts with label summer. Show all posts

Wednesday, July 24, 2013

Summer's #1 Plant Remedy for Cuts and Scrapes


Summer seems to be the season for cuts and scrapes as the weather causes us all to spend more time outdoors.  Between gardening, swimming, and all kinds of sports and camping - these small injuries are bound to occur.

That's where this herbal remedy comes in for these minor problems.  This plant is abundant, free and effective...my favorite combination for herbal cures.  You don't have to order it or do any special prep (in the summer) as it's most likely underfoot in most grassy locations.

What it is you ask?  It's the humble plant, "Plantain" or officially known as "Plantago Major" or "Plantago Lanceolata."  I'll be focusing on the first variety as it's very easily found in rural, suburban and even urban neighborhoods.  

 
The flower of Plantain. Its flowers and seeds feed butterflies and even birds.

My first introduction to this amazing plant was from my mom.  Years ago she told me how when she was just a girl, had gotten a huge gash in her big toe from a hatchet that had fallen on it.  Now, this was in the depression and years before antibiotics were discovered. My grandmother found some plantain leaves, made a poultice from them and applied them to the carefully washed gash.  It took a few applications of this plant but the fairly deep wound healed beautifully and with only a minor scar.  

My mom wasn't into plants or herbs at all but she remembered the story and the plant and showed me what it looked like.  I was so intrigued by her memory and tucked it away into my memory until I had a chance to use it myself.  

Plantain thrives in dry poor soils.

That chance came some time later when I was changing out a storm window for the screen and the window fell heavily against my finger and gave it a nasty cut.  It was summer and my mom's story came back into my head, so I quickly located some leaves of the plant and made a poultice (where you mash the clean leaves of the plant by crushing and bruising them) and placed it on the gash with a bandage to keep it in place.  I did this a few times over the next few days and my cut not only healed beautifully, but with no scar as well.  

I was impressed.  Since then I have used it several times for cuts, bruises and scrapes.  I clean the area and place a poultice of mashed leaves on the area and then bandage to keep the leaves in place.  I've even just wrapped leaves around the wound area and secured with masking tape if I couldn't find a band-aid...worked like a charm.

It loves the edges of roadsides and its leaves are resilient to foot traffic.

Europeans understood its value enough to bring it to the New World when they settled here. 
"Plantain was brought to the US and also to New Zealand by European settlers who valued it for it's culinary and medicinal properties. The settlers seemed to leave the plant wherever they went, thus earning it the name "White Man's Foot' or "Englishman's Foot" by the natives of both countries." 1

Some interesting facts about this plant are as follows...
"Plantain is very high in beta carotene (A) and calcium. It also provides ascorbic acid (C), and vitamin K. Among the more notable chemicals found in plantain are allantion, apigenin, aucubin, baicalein, linoleic acid, oleanolic acid, sorbitol, and tannin. Together these constituents are thought to give plantain mild anti-inflammatory, antimicrobial, antihemorrhagic, and expectorant actions. Acubin has been reported in the Journal Of Toxicology as a powerful anti-toxin. Allantoin has been proved to promote wound healing, speed up cell regeneration, and have skin-softening effects."1 
It also is very edible and reputed to be good for the lungs as this modern study indicates...
"Medicinally, plantain is astringent, demulcent, emollient, cooling, vulnerary, expectorant, antimicrobial, antiviral, antitoxin, and diuretic. Plantain is approved by the German Commission E (a sort of German "FDA" that studies and regulates herbs and herbal uses) for internal use to ease coughs and mucous membrane irritation associated with upper respiratory tract infections as well as topical use for skin inflammations. Two Bulgarian clinical trials have suggested that plantain may be effective in the treatment of chronic bronchitis."1

The leaves of this plant are highly medicinal. Try to locate leaves away from roadsides and areas where it could be sprayed. 

Plantain can be found along the edges of trails, paths, rocky areas and many times in sidewalks and urban locations.  It's often found in lawns as well and the large rosette of leaves are easily located.  

I believe people's first hand stories and experiences lead to our discovery of plants as valuable remedies.  Sure, you can use antibiotic cream on your cuts, but learning first hand what these plants can do give you valuable personal experience with the plant and what it does.  If you're on a hike, camping or out somewhere with no first aid available, having plant knowledge can go a long way. 

This is also so valuable to pass along to your kids and other generations so this highly medicinal plant's practical use doesn't get lost.  When I was looking up information on Plantain, I found it listed on many sites as a weed and a plant to kill.  And true, while it does grow in places I don't always want it too, I never weed this plant without realizing its beneficial qualities.

Hope this helps and you'll be able to discover how helpful plantain is...blessings!

What have you used plantain for?


References:


1. http://www.prairielandherbs.com/plantain.htm 

More info can be found here as well: 

2.http://botanical.com/botanical/mgmh/p/placom43.html
3. http://www.susunweed.com/herbal_ezine/July05/healingwise.htm  


Linked to these amazing blog parties... Frugal Days and Sustainable Ways
Homestead Barn Hop 

Wednesday, June 26, 2013

Make Your Own Moroccan Mint Tea


 The heat of summer has definitely rolled in here and with that comes the need for a great refreshing drink and Moroccan Mint Tea comes quickly to mind.  Although it's a great 4 season tea, it really comes across best iced in the summer (at least to me!)

When you hear the word "Moroccan," images of a busy and crowded open air market amidst hot temperatures immediately comes to mind.  It's no wonder that spearmint is the refreshment factor in this very famous tea.

In North Africa, in Morocco, Algeria and Tunisia specifically, this tea is served all day.  It is considered a drink of hospitality and is served whenever visitors arrive as well as at mealtimes.  Shop owners will greet you with a cup of this tea when you enter their shop.  


 Best of all, this tea is made from very simple and basic ingredients.  I really enjoy using bulk tea for the Gunpowder, but even a green tea bag will work.  You can also use spearmint fresh or dried, depending on what you have on hand.  Again, a spearmint tea bag will suffice if you want to give this a try.  I like using the best ingredients available to get the best flavor, but feel free to experiment.


 To get to the actual preparation, I will give you a recipe by the glass and for a teapot amount.  You'll probably want the teapot version because this tea will be addictive!

By the Cup:

1 tsp of Gunpowder Green loose tea.  (Use a quality green teabag if you don't have the loose tea)
1-2 nice sized sprigs of fresh spearmint. (Use a teaspoon of loose dried spearmint or a teabag of a quality spearmint tea)
1 tsp of sugar (traditionally it's sugar, but you can use Stevia or honey if you like)
1 to 1/2 cups of boiling water (depends on the size of your mug or glass.)

Steep tea leaves, mint and sugar in boiling hot water for 3 minutes.  Gunpowder is a strong tea so if you oversteep it, it can become bitter.  Save these tea leaves for at least one more steeping as well.

To mix the tea, pour into another glass and then pour back into the original glass.  This also aerates the tea.  

Garnish with a sprig of fresh spearmint to serve.  Drink hot (like they do even in summer) or serve over ice for an amazing refreshing drink.


 By the Teapot (1-1/2 quart):


1 Tbsp of Gunpowder Green loose tea.  (Use a quality green teabag if you don't have the loose tea)
4-5 nice sized sprigs of fresh spearmint. (Use a teaspoon of loose dried spearmint or a teabag of a quality spearmint tea)
3-4 Tbsp of sugar

 Steep tea leaves, mint and sugar in boiling hot water for 3 minutes.  Gunpowder is a strong tea so if you oversteep it can become bitter.  Save these tea leaves for at least one more steeping as well.

Pour your first cup of tea out and then back into the teapot to mix and combine well. 

 (If you're feeling very Moroccan, then when you're ready to serve, pour your tea into tall heat resistant glasses and pour from as high as you can manage with out spilling. (Do not hold the glass and place on a tray to catch spillage.)  This will aerate the tea and create a froth on top...yum.  Not a necessary step, but very North African if you're are daring with your tea experiences.)

Photo Source

Sip, enjoy, repeat.


I make a dry mix for winter use as it's one of our son's favorite teas.  Just a mix of half gunpowder and half spearmint.  Use a tsp and a half or to taste.  Makes a great gift as well.

Two great tastes combine for one amazing refreshing tea.  And of course, this tea is full of health benefits as well.

Thanks for reading...Blessings!


Linked to these amazing blog parties....Frugal Days, Sustainable Ways
Farmgirl Friday From the Farm Blog Hop
The Backyard Farming Connection Hop Wildcrafting Wednesday
Natural Living Link-Up 

Tuesday, April 16, 2013

Container Plant How-to's


Whenever I'm looking for a burst of color in a sea of gray pavement, nothing does the trick of filling out a space like container plants.  They are colorful and mobile and bring life to an otherwise boring spot in the yard.
I've been growing flowers in pots for years now and learn something new every year.  I've really settled on flowers that I love and always look in gardening catalogs for new inspiration with different color and plant combinations.  
If you're considering making your own flower containers this year, it's good to know some basic information in order to have the best flower display all summer long.


 1. Know your location.

 Is your spot shady?  Full sun?  Windy? Sheltered?  These are all important things to know when considering what plants to choose for your containers.  Place an empty pot in the spot you're looking to plant and get a general idea of the sun/shade conditions.  I tend to go with plants that can tolerate sun/part shade as I have mostly an eastern exposure with some later afternoon sun.  
Is the spot near a easy water source?  Locating pots far away from easy watering is an invitation to dead plants.  My pots are always located close to an outside rain barrel or indoor water source.  
Is the spot in a hot,  non sheltered location? You may also want to consider using a self-watering planter and plants that are good with hot sun for 6-8 hours.  This will limit your flower choices but it's so important to plant to your location for the best results.


2. Make sure to pick great soil and use the best pots. 

I like to make my own potting mix blend.  I generally use a bag of great basic potting soil, a bag or two of vermiculite or perlite, and a bag of peat moss.  I don't like watering plants twice a day so I tend to use half soil and half of a soil lightener to get a great mix.  I try to use a bit less soil in the hanging plants so they aren't so heavy but enough soil so one watering will be good for them.  
I like plastic pots the best.  I do have a terra cotta pot I use, but I have to keep it in standing water as it dries out way too fast.  Plastic is light, moisture retentive, easy to store and reusable year after year.  Porcelain is nice too, but is heavy and can't be kept out all winter as it will crack.   


3. Pick the flowers and plants that will work best for your containers.

You will want to choose the best flowers for your sun/shade location and ones that will give you continuous color all season long.   I have gone back and forth with flower choices over the years to figure out what works best for us.  I like pinks, blues and purples the most, but have found my tastes have evolved as I discovered certain flowers just didn't handle the long bloom season.  Like the "Wave" series of petunias would be beautiful for a month or so but would really burn out by mid-summer.  I would have to pinch them way back and wait for them to rebloom.  It didn't work for me because I want color all the time...all season.  The flowers in the photo above are excellent in containers giving me great color all season, holding their color, not needing deadheading, can handle dry conditions and are generally hardy.  Some are old fashioned, like begonias and coleus, but they are beautiful and last a long time.  Don't forget to add non-flowering plants like coleus, caladium bulbs and even herbs to your collection.
You may want to plant the same kind of flowers all in one pot when placing the pots in a large display.  Some plants are more vigorous and will overtake another plant.  Try to find out what the flowers growing habits are before putting them together.  I solved this problem by planting the same flower varieties in the same pot and then placing the pots all together.  It also helped me to see what plants were more aggressive.  Always check the growth size of your plants as well.  Taller plants will always overtake the shorter varieties.


4. "Overplant" your flowers and fertilize with a long 
 season fertilizer as well as weekly feedings.

You will want to plant as many flowers in a pot in order to get the pot to be lush and overflowing.  This is the one time you can ignore the little tags as to flower spacing and "crowd" your container with flowers. I figured this out after buying different hanging flowers pots.  After the growing season, I noticed they overfilled their containers with plants.  By doing this, your pots will fill out quickly with foliage and eventually blooms instead of waiting the whole growing season for this look, you can achieve it much faster by overplanting.
Fertilize, fertilize and fertilize!!  I use an organic 2 month granular fertilizer as well as an organic weekly or monthly one.  This will keep all the blooms nice and healthy and solves the problem of the overplanted container.  As long as you water and fertilizer consistently, you're sure to have beautiful blooms.

This is the basic information that I have discovered along the way and I continue to learn more as I experiment with different flowers and plant combinations.  Planting your own containers is a great way to express your own creativity and to create your own floral space.  

What are some of your favorite flower combinations?  Blessings!


Linked to these amazing blog parties...Waste Not, Want Not Wednesdays
Frugal Days, Sustainable Ways Wildcrafting Wednesday
Farmgirl Friday Homestead Barn Hop
Tuesdays with a Twist Empty Your Archives
Seasonal Celebration Wednesdays Simple Lives Thursday


Tuesday, November 20, 2012

Garden Review and Vegetable Thanksgiving...


November means more to us than just pumpkin pie, it means it's time to get the garden ready for winter and let it rest,  We haven't mastered gardening year round quite yet but hope next year to put in a small raised bed and plant kale there to get us through to at least December. I finally realized that I'm really not a lettuce fan (gasp!) and that I like greens so much more.  I think it's because greens are more nutrient dense and if I am going to eat greens, then I'm going for the greenest of greens.  So, in the meantime, we mulch our garden heavily with chopped leaves/grass and bales of straw.  Actually I'll let the straw decompose a bit and use it to mulch the paths next year.  


As you can tell, I use lots of pots to supplement our small garden space.  I also use them to plant a nice sized display of flowers for our front patio space...you can see what they look like here.  I have used all of our flower beds for herbs and perennials, so pots are the perfect remedy for always blooming annuals...zinnias, geraniums, alyssum, vinca, marigolds and even a fun elephant ear.


I've also used the pots for herbs such as thyme, peppermints, spearmint, cilantro, rosemary, parsley, chives and calendula.  Peppers, including Mariachi's and Banana, also grow in these pots.  I've been growing tomatoes in them, but will keep them in the garden next year as they didn't produce very well.  The biggest drawback to pots are the fact that they need lots of watering if they are in full sun.  My herbs don't and I keep them in part shade and they are happy campers. A great reason to grow in pots is that you CAN move the pots around if the temps start to rise and the plants need a break.  I move smaller pots around quite a bit.


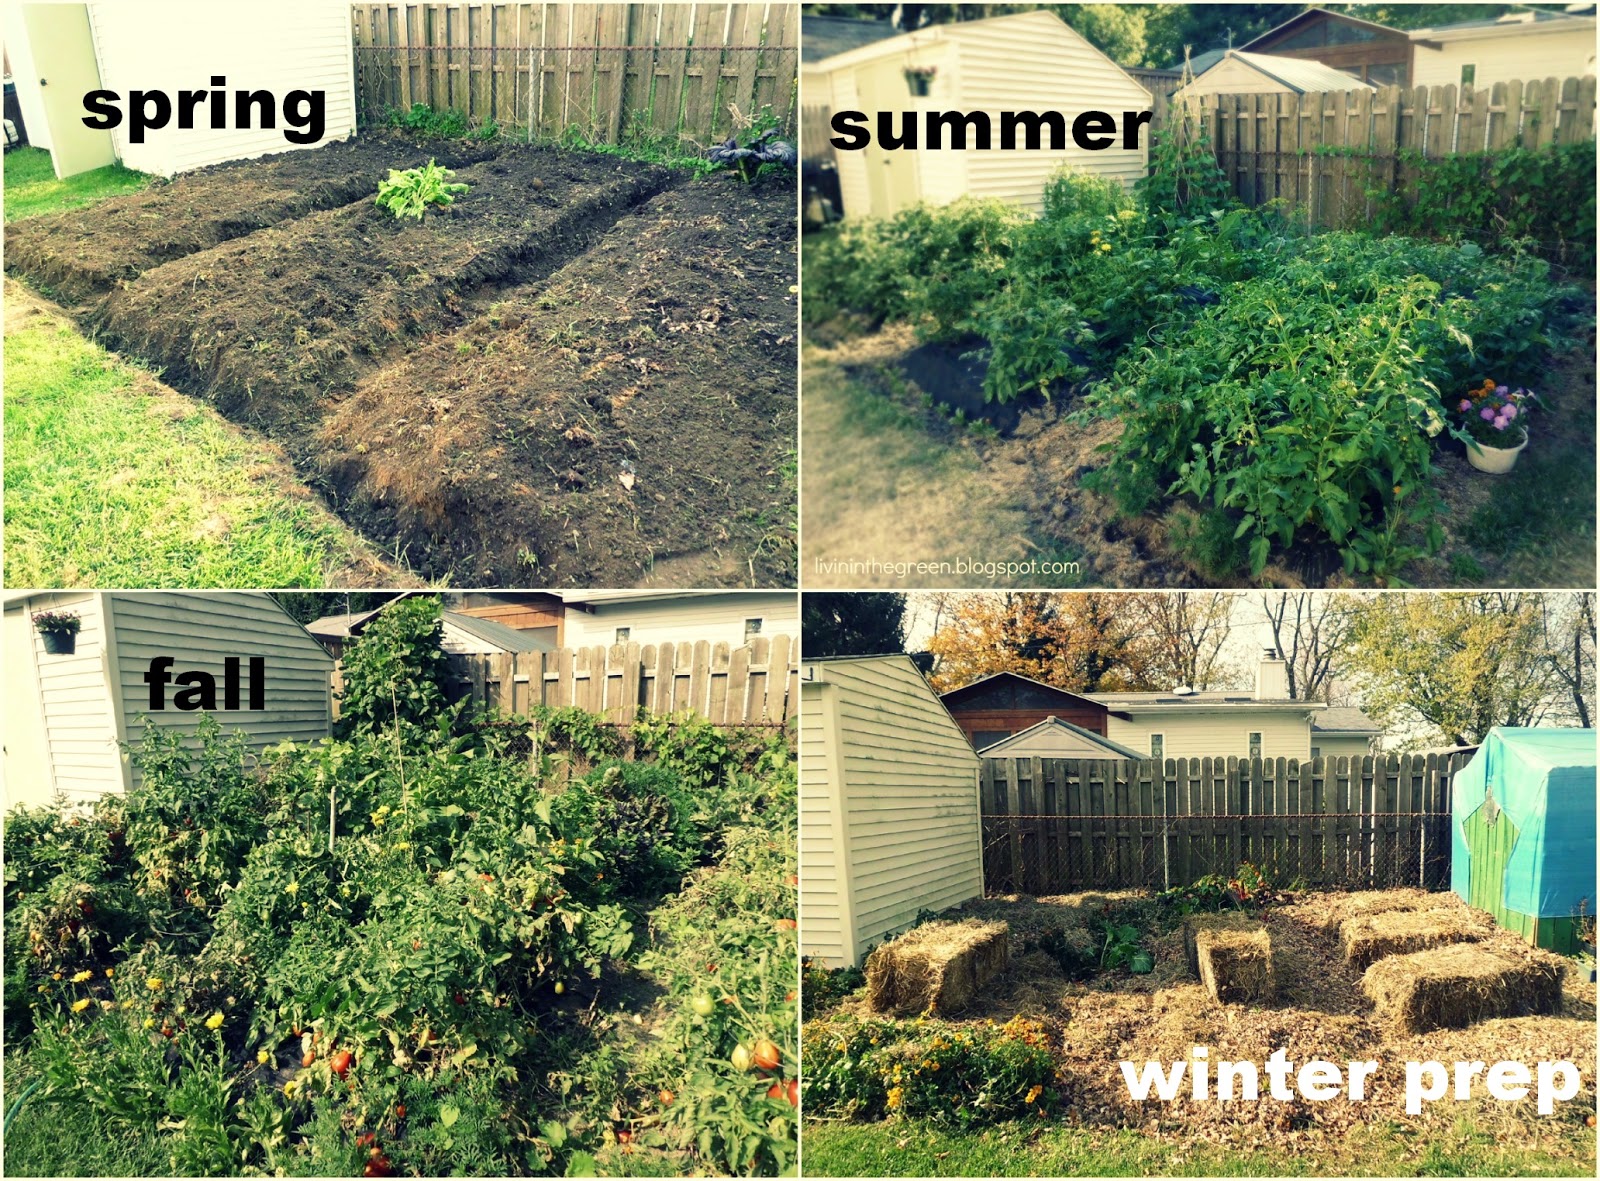
One great thing about blogging about my garden is that it forced me to keep a visual record of the garden for the growing season.  So it was fun putting together this collage of the seasons and to see it all at once.  To be a continuous gardener, you must be visionary and willing to make mistakes.  There's always next year to try out a new method or new vegetable.  The visionary part comes in when you get the soil ready like the soil in the spring photo and can already envision the fall photo in your mind.
 If this garden space looks small, that's because it really is.  But don't let small spaces fool you...with effective gardening, you can get lots of fresh vegetables to eat AND plenty to can, dry and freeze for winter use.


Case in point...these are just a sampling of the produce we got from the garden.  I was able to can 60 jars of whole tomatoes...plus still lots more for fresh eating and fresh marinara sauce.  Our beans and summer/winter squash came from our community garden plot; another option for those with small spaces.  This is our fourth year there and we've finally figured out what vegetables grow well there...tomatoes not being one.  However, the squash did well and the beans, so we'll concentrate on those vegetables.  We're going to try sweet potatoes there next year too as the soil is great for root crops. To see my favorite picks for this year's vegetables, click here.

Well, that's it for the garden 2012...I'll be reading up on some other blogger's great ideas for gardening over the winter while our soil rests and we rest!  SO thankful for all the great food we've gotten from a little space...it's the gift that keeps on giving!

Do you garden or plan to soon?  

Linked to these amazing blog hops...Homestead Revival 
Clever Chicks  Lisa Leonards Design
Farmgirl Friday Living Green Tuesdays
Frugal Days, Sustainable Ways 
Waste-Not, Want-Not Wednesdays Wicked Good Wednesdays
Simple Lives Thursday Farmgiril Friday Blog Hop

Tuesday, August 28, 2012

Growing Cilantro in Pots All Season


Cilantro.  It's difficult to describe the flavor, but it certainly packs a whollop and brings any food or dish up a notch.  When I was first growing/eating fresh herbs, I could hardly handle it's fresh, pungent, slightly lemon aroma.  I remember planting patches of it in my enthusiasm for growing herbs.  I never used it, but growing it for years finally allowed the plant flavor to "grow" on me until now,  I absolutely love it! But Cilantro (also known as Coriander), is a little tricky to grow.  It likes cooler weather and tends to bolt and go to seed (here is where the coriander comes in) in hot temps.  In other words, like lettuce, it grows and goes.  So, you have to take care and keep it harvested regularly in order to get any use out of it and replant it frequently.


This year, even though it was a very hot summer, I am growing my third planting.  I have been using pots because in this extreme heat, I am able to move Cilantro into a shaded area to grow.  It has done extremely well in the shade (late afternoon sun for a few hours) and I have kept it much longer than if it had been growing in the garden. 
I use two pots for this.  I have starts in one and when it matures enough for a picking, I start the second pot.  Once the Cilantro goes to seed (about the third picking), I pull out the old plants, freshen the soil with a little new dirt and organic fertilizer and put in more seeds.  Sometimes after the season is done.  I let the mature plants go to seed and let the seedheads stay in the pot.  This has given me a fresh start the next spring.  Always a great bonus to get free plants!


So, make successive plantings, and use pots to keep it in the shade during the heat of summer.  It also makes it much easier to grab a small amount when it's only in a pot outside the door.  I have found the amount I've been growing is enough for our table use as Cilantro doesn't dry well at all.  

New pot of baby Cilantro next to its full grown predecessors...


A very easy and delicious herb to grow and keep when given the right conditions.  I absolutely love it in "Cilantro-Lime Rice."  I use a huge handful minced up in the rice along with the juice of one or two limes.  It is a huge flavor enhancer without relying on salt.  

What's your favorite Cilantro recipe?  Blessings!!  

Linked to these blog hops: Frugal Days, Sustainable Ways , Lisa Leonard Online: Hello Mondays , The Prairie Homestead Barn Hop , Living Green Tuesdays

  OffTheGridat-30 OffTheGridAt-30   

Monday, August 6, 2012

A Summertime Community Picnic


What's summer without the fun out-of-doors and a great picnic to boot?  Being outside is premium for me this time of year because of our cold winters.  This summer has been exceptionally hot with temperatures in the 90's exceeding twenty days and with our high humidity, that means living indoors, which feels like the winter months...bummer.
So we were so excited to go to an annual community picnic this year hosted by some friends of our family.  We've been going for over 10 years and it's a Saturday that's always a great day for us.  


This year the temperature was perfect and allowed for a great turnout as well.  Lots of people from all over our town and neighboring areas as well came for this fun event.


The picnic is hosted by a local nursery who gather in all their clients and friends to celebrate a great year together.  Their property is full of every beautiful kind of shrub and tree imaginable...


Our family group has our own mini reunion under one of the tents.


You can't have a great picnic without all the food, and everyone brings a side dish or dessert to share with everyone else.  It's a massive pot luck dinner and worth a couple of trips around the table.


The family hosting the picnic provides the meat which is pork, turkey, this year venison tacos, and beef.  It's slow roasted over an open fire pit, shredded and served.


What's a picnic without a bean salad and zuchinni?


One tent is completely devoted to folk musicians who come to play as a group for this event.  It's a wonderful backdrop of music which fits the picnic entirely.


One of our favorite parts of the picnic is the hayride which lasts a good 30 minutes.  We casually take a ride around the nursery property and some take the opportunity to enjoy sweet treats on the ride!


A perfect way to end the day!  Blessings!

Linked to Life Rearranged

Saturday, July 28, 2012

Strawberry Lemonade


Lemonade is a perennial summer favorite.  We love it at our house and make it as treat for our family.  We either make it by the pitcher or glassful.  It reminds us so much of the lemonade at the county fair where they make it right in front of you...delicious AND refreshing.


Our two sons were entertaining on a 90+ degree day.  They are amateur filmmakers and were filming shots outside with a couple of friends, so some cold watermelon and lemonade seemed just the ticket.  However, while regular lemonade was perfectly fine; strawberry lemonade sounded even better.  I had made this for the first time some months ago when going on a picnic with a friend and it turned out great.  


So, that's what I decided to make.  It's super easy and fast.


Start with a great basic recipe for lemonade.  We have our own recipe, I use half of a lemon per 12 oz of water.  Sweeten with 2 tsp of sugar (or more to taste.) But if you want to make a pitcher's worth, then here's a great recipe and it makes 2 quarts.  Click here for recipe.
Next, you add one cup of fresh or frozen strawberries to your blender for 2 quarts.  Add with some water to blend easier.  Blend until finely pureed and strain if desired.  I have a Vita Mix blender, so my puree was totally liquefied.  Add to your lemon concentrate and add water to the mix.  Sweeten to taste.  How much sugar will depend upon how sweet your berries are, but you'll need to add some as the lemons will be tart.  


Voila! There you go...strawberry lemonade.  Couldn't be easier.  I want to try this with other fruit as well, peach and mango to mention a few.  So fun...and you don't need a juicer to make this!

By the way, the guys LOVED the lemonade!  They were surprised by it being homemade and it tasted great on such a hot day. 

What fruit do you think would be fabulous with lemonade?  Blessings!
Check out some more great ideas at Frugally Sustainable.
Linked to Miz Helen's Country Cottage , Fresh Foods Wednesday Blog Hop

Tuesday, July 24, 2012

Rain Barrels: Save Your Rain for a Sunny Day...


This has been the perfect summer for using our rain barrels.  With lower than normal rainfalls and lots of hot, hot weather, these beauties have been a garden (and water bill) life saver!
I really can't say enough how thankful I am that we purchased two of these about five years ago.
I had been researching them and thought what a great idea to use free water to water the landscape.


If you do any kind of gardening or even water your lawn frequently, then an investment in one or more rain barrels is the way to go.  It's like harnessing solar or wind power, a great way to use what is around you to resource your own needs.  And with so many places in this country experiencing a drought, and many countries experiencing water shortages...it's a way to...yes, I'll say it, help save the planet!


While they can be a bit pricey to purchase, depending on the size, design and company, the return far outweighs the investment.  We purchased ours online as most companies offer free shipping.  Craig's List is a good place to look too.  Click here to get started shopping online or if you're feeling very crafty, then click here to learn how to make your own.  There's also great tutorials on  You Tube that show you how to get started.


The only thing I don't like about our rain barrels is that they aren't big enough.  Go for the 55 gallon size, you won't regret it. Once you start saving water, it becomes a bit addictive...so be aware!


Hope you were inspired to save your own water for a sunny day.  Blessings!

Check out more sustainable ways to live at this link!