Pinterest

Showing posts with label essential. Show all posts

Sunday, December 30, 2012

Pressure Cookers: A Kitchen Classic Basic

(Photo Source)
Some of my first cooking memories as a child are of a loud hissing noise emanating from my mom's little kitchen.  This was usually on a weekend when mom's Roast Beef Dinner with Potatoes and Carrots were usually   oursundaydinnermenun    .I remember my first Christmas being married.  One of the top three items on my wish list was for a pressure cooker.  I wanted one REALLY bad and I must have told a lot of people because I ended up getting two that year.  No problem.  My sister got two waffle makers, so we each swapped our extra appliances.  Perfect.

I used that little cooker for a LONG time.  It was perfect for the two of us as I was working full time and it was a fast way to cook a small roast when I got home from a long day.  I actually still have it even though it's a few decades old now.  I went on to buy a 12 quart pressure cooker too.  I use that almost exclusively for canning, but I did use it different times when I was cooking a roast beef dinner for a lot of people.  

What's so great about pressure cooking? 

1) It's first and foremost advantage is its ability to cook fast...really fast.  How about cutting down on the cooking time from 3 hours to 1 hour?  That's right.  It can cut cooking time by 1/3 on many recipes. Why is that an advantage?  Well, knowing that you're food will turn out well and cook fast easy makes cooking at home an advantage.  Especially if you're working full time or just busy in general.  It makes meal planning a bit easier too.  You don't have to start a meal 6-8 hours in advance when you're too busy to plan on what's for supper.  I love my crockpot too, but it definitely takes thought to get a meal together when you slow cook.

2) It's my favorite way to cook dried beans.  
Cooking dried beans in a pressure cooker is a dream!  I actually purchased my latest pressure cooker (electric) with cooking beans in mind.  It's so fast and easy and of course, so much better and economical than a can of salted canned beans.  I also like the idea of being able to store lots of dried beans in the pantry with rice.  They're great to have on hand.  (Read my post, 3 Fool-Proof Ways to Cook Dried Beans.

3) It's a great way to cook leaner cuts of meat which means saving $$$.
Go ahead and buy those round steaks and roasts.  I love my crockpot and they do a nice job of cooking, but if I'm short on time...my pressure cooker comes to the rescue!  My sister made a roast beef dinner complete with carrots and potatoes for her family and hungry guests in an hour.  With this kind of efficiency; it;s time to "watch out Rachel Ray, this could be the new 30 60 minute meal sensation!"  Also, if you tend to cook game meat, especially tough cuts of venison, a pressure cooker does a great job tenderizing the meat.

4) A pressure cooker is an excellent way to make quick quality broth/stock.
I was reading a few articles online about making stock with a pressure cooker.  Chefs do this in the kitchen and a recipe for it is in my pressure cooker cooking guide.  It takes about an hour...wow.  I've actually made soup up in a hurry by using the pressure cooker.  

How about the nutritional aspect of pressure cooking? 
A great question to be sure. Even though some vitamins are lost during cooking, the amount of vitamins lost is the same as standard cooking.  And if you consume the cooking liquid, you will regain some of the lost nutrients. According to this Eating Well  online article, "In the case of grains and legumes, although the vitamins and heat-sensitive vitamins and phytonutrients are vulnerable to deterioration, the net result of pressure-cooking is a positive nutritional gain—from the increased digestibility of the macronutrients (protein, fiber and starch) and the increased bioavailability of the essential minerals."  In other words, the beans are actually more easily digested with less "beanly" side effects.

What kind of pressure cooker works for you?
There are so many models to choose from and nowadays they are so much easier to use.  I have an electric model (my latest purchase) and I can put pinto beans in DRY and have them come out fully cooked within 40 minutes!!!  It's miraculous!  I am pretty in "love" with the electric version.  It sautes, browns, warms, and automatically shuts down when finished.  It also doesn't make any noise.  Seriously.  It's a great pressure cooker to start off with as it is so easy to use.  
My one tip?  Get the largest capacity pressure cooker you can afford (mine was under $90.)  You'll want to be able to cook up enough for the family and have extras.  

You may find a pressure cooker at a yard sale.  If you do and it's an old model, make sure you have an instruction book so you can buy a new gasket, and release valve for your cooker.  On my old models, there are only three parts that would need replacing.  The gasket is a rubber seal that can get cracked, brittle or stretched out if too old.  I would suggest asking someone who knows about pressure cookers before purchasing an old one.  Unless the one you find is still in its box and looks new.  These older models are a little trickier to use but if you are patient, completely fine.  I personally love the electric model and plan on keeping this version busy in the kitchen!


This is my electric pressure cooker...LOVE!!
There you have it.  I've come a long way (over 20 years!) since my first Mirro pressure cooker.  And I can't think of getting through my homemaking years without it.  I hope this helps you to make up your mind about this very valuable basic appliance.  It's a bit of an investment, but if you're into cooking, it's definitely an item you'll want to consider.

What are your experiences with a pressure cooker?

Blessings! 

Linked to these amazing blog hops... Living Green Tuesdays 
Waste Not, Want Not Wednesdays  
Frugal Days, Sustainable Ways 
Full Plate Thursdays 
Farmgirl Friday 
Backyard Farming Connection 
Wildcrafting Wednesday
Homestead Barn Hop


Tuesday, October 9, 2012

Making a Double Lemon Balm Tincture


So many of you have probably not only heard of tinctures, but have already made plenty of your own.  I have made them in the past, (I mean MANY moons ago...) and have recently been making them again.  I stopped making them because life got busy.  However, seeing how easy and inexpensive they are to make and use, it seems silly not to make them.  In this post I will show you how to easily double tincture whatever herb or root you are using.  I found this technique last winter when I was researching on You Tube on how to tincture again.  It makes so much sense, I had to try it myself.


I am using Lemon Balm AND I am tincturing it fresh.  I've dried it before and it tastes like pretty much nothing.  This is one of those herbs that don't hold on to their essential oils very well.  Lemon Balm itself is a calming tonic herb.  It was generally used to help promote an overall sense of well-being.  It's also soothing and sedative, which is why I'm making some!  I plan on using it before going to bed and for those stressful days.  I normally use Valerian to help relax, but that stuff makes me VERY sleepy (not good during the day) and I'm figuring that making a tincture formula will help me regulate how much I need as opposed to using an herb in a capsule.


On to tincturing!  Get your Vodka, and make it at least 80 -100 proof for the best extractive qualities.  I have mine ready to pour...


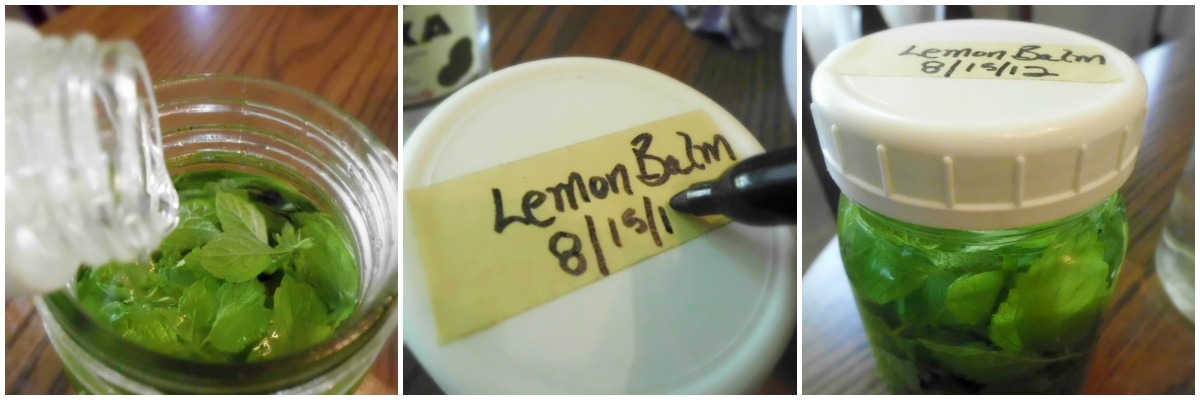
It's a pretty simple process.  Gather your lemon balm, making sure to use the uppermost leaves for the best quality and pack it tightly into a clean, dry, sterile jar.  I am using the ever popular canning jar, pint size to be exact.  Make sure to macerate or crush the leaves as much as possible to get those essential oils flowing...


Fill to the top with your vodka, label and cap.  Make sure all the leaves are covered.  I usually add more vodka after a day because the leaves absorb some of the liquid.


On my label, I put the date of when the tincture is done.  It's usually four weeks.  You can put both start and finish date if you want.  I sometimes let it go a little longer.  When it's done, you will need to strain your tincture into a clean jar or container.  Notice the leaf color change?


Here's a single tincture of lemon balm. I love the nice amber color.  This is fine to bottle and use right now, BUT we are going to do this again...!


Now, simply follow the first steps again, and add the first tincture to the fresh lemon balm leaves. 


Here we go with Round #2...top off with more fresh vodka if your tincture doesn't cover the leaves you have in the jar.


Label for four weeks...


Then strain, you know the drill and this is what you get...can you tell which one is the double tincture??!!!


Single tincture on the left...Double tincture on the right.  Amazing!

Well, there you have it.  A double tinctured lemon balm.  You can of course, do a triple tincture but I doubt the color will show up much darker on camera.  I will definitely triple tincture next summer when my lemon balm is in full swing.  To make more of a concentrate for the same amount of tincture is a great idea AND I'm glad I fell across this little jewel of information on You Tube. 

Remember too that you can use this technique for all your tinctures; just always start with fresh material.  It could be pricey if you are buying the plant material, but if you have your own, like echinacea, valerian, chamomile, peppermint, elderberry...you get the idea.  The cost is minimal.  (Don't forget to pin this so you can save the "how-to's" for later!)

What's your favorite tincture to make for your herbal medicine cabinet?  Blessings everyone!

(Want another great use for Lemon Balm?  Check out this post, Tea-licious with Lemon Balm.)


Linked to Farm Girl Blog Fest , Backyard Farming Connection Hop
Welcome Wednesday , Frugal Days, Sustainable Ways  
Rural Thursday
Simple Lives Thursday 
Natural Living Link-Up
Small Footprint Friday 
Homestead Revival Barn Hop